Securing your zone with DNSSEC and DANE
Contents
Recently, I’ve been learning about DNSSEC and DANE, inspired by Rich Felker’s recent work on mxclient. DNSSEC is an extension to DNS that provides authentication of DNS results. This means that clients can cryptographically verify that the results from their DNS queries are correct. DANE relies on DNSSEC, and allows you to publish your TLS certificate or public key for a particular service (for example, HTTPS or SMTP) in DNS.
Together, these two technologies offer a few advantages over the usual method of validating X.509 certificates:
- You only have to trust the root DNS key, rather than a bunch of certificate authorities. On my system, I have 138 different root CAs!
- Signing your DNS key is the responsibility of the parent zone, and is done automatically. You could even use a self-signed certificate instead of periodically requesting a third-party to issue you a new certificate (though, this would exclude clients that don’t support DANE).
- You can set different certificate validation policies for different services running on the same host.
- It solves some problems for SMTP, which typically only uses opportunistic encryption. See this post by Filippo Valsorda for more about that.
Unfortunately, while DNSSEC and DANE have been around for a while, they aren’t widely adopted. This post aims to improve the situation by explaining how it all works, and how you can start supporting them on your domain.
Overview
At a high level, DNSSEC allows you to publish signatures for the
records in your zone, along with public keys that can be used to
verify these signatures. The signatures and public keys are just
records themselves (RRSIG and DNSKEY, respectively), leading
to a very nice property of DNSSSEC: all cryptographic operations
are done up front. All the nameserver has to do is serve the DNSSEC
record data. It doesn’t need access to the private key at all.
There are several different tools that can be used to add DNSSEC records to your zone, such as ldns-signzone and dnssec-signzone. However, since I wanted tools based on BearSSL, and I’ve always found that the best way to learn a technology is to implement it, I ended up writing my own called dnssec-rr. This post will be illustrated with examples using my own tools, but the concepts should apply to other tools as well. It also assumes you are already running an authoritative nameserver for your domain.
DNSSEC adds four new record types: DNSKEY, DS, RRSIG, and
NSEC. Very briefly, we have:
DNSKEYis your public key.DSis a hash of yourDNSKEY, and is added to the parent zone to establish a chain of trust.RRSIGis a signature of a set of records, all with the same name, type, and class.NSECindicates the absence of a range of records in between the valid records in a zone.
Let’s start with a plain zone file called example.com.zone and
incrementally add these new records.
$ORIGIN	example.com.
$TTL	86400

@	IN	SOA	ns1.example.com. root.example.com. (
				2020052000	; serial
				7200		; refresh
				900		; retry
				1209600		; expire
				1200		; negative cache TTL
			)
		A	1.2.3.4
		NS	ns1.example.com.

ns1		A	1.2.3.4
DNSKEY
The first thing we need to do is generate a key we will use to sign
our records. BIND and LDNS both use a special format for these keys,
but we will just be using a key in PKCS#8 format generated by
brssl.
DNSSEC supports a number of different signature algorithms, but
two good choices for use today are ECDSAP256SHA256 and RSASHA256.
You can generate keys for these algorithms with brssl:
$ brssl skey -gen ec:secp256r1 -pk8pem key.pem  # generate P-256 EC private key
$ brssl skey -gen rsa:2048 -pk8pem key-rsa.pem  # or, generate 2048-bit RSA private key
A DNSKEY contains the algorithm identifier and the public key
data. It also has a couple of flags: Zone Key, which is always set
for our purposes, and Secure Entry Point, which will be described
a bit later.
Let’s generate a DNSKEY record with both flags set, containing
the public key corresponding to our private key, then add it to our
zone:
$ dnskey -k example.com. key.pem | tee -a example.com.zone
example.com.    IN      DNSKEY  257 3 13 vj2jYoUXYP5L/Y3VKwy2tv1lTQKvieaDdg2DpZRItJ0TblzoKoJ+9WQgxi4/mq0JkFUFeltRmhPnhtXoCH7Tfw==
NSEC
Now that we have our public key added to our zone, the next step
is to “fill in the gaps” with NSEC records. We need to make sure
we have a signed response for any query, so these are the records
we return when a query has no results. Their signatures prove that
the server wasn’t withholding the requested record.
The NSEC record for a particular name lists the record types
available at that name, and specifies the next valid name in the
zone.
For example, say we had two sub-domains, ftp and irc, and ftp
has A and AAAA records. We add a NSEC record to say “ftp
has exactly two record types, A and AAAA, and the next valid
name is irc”.
ftp IN NSEC irc A AAAA
If a client asked for the MX record for ftp, or the A record
for gopher, the server would return this NSEC record, along
with its signature.
We can use the nsec tool to add these NSEC records to our zone:
$ nsec example.com.zone | tee -a example.com.zone
example.com.    1200    IN      NSEC    ns1.example.com. A NS SOA RRSIG NSEC DNSKEY
ns1.example.com.        1200    IN      NSEC    example.com. A RRSIG NSEC
RRSIG
Finally, we are ready to sign our zone. An RRSIG contains a
signature of a set of records with the same name and type. For
example, the NS records for your domain are grouped together and
signed, producing a single RRSIG record. This signature record
will be returned along with the result of the query, proving that
it is authentic.
The data signed in an RRSIG also includes the algorithm identifier,
the time period for which it is valid, the name of the zone containing
the corresponding DNSKEY, and the key’s “tag”. The tag is a short
checksum of the public key and is used to quickly identify which
key should be used to validate the signature.
The rrsig tool is used to produce these signatures. Since we will
need to periodically replace these signatures with new ones, it is
best to save them in a separate file and use $INCLUDE in the main
zone file. Make sure you bump the serial number in your SOA record
before signing your zone, or else the signatures won’t match!
$ echo '$INCLUDE example.com.zone.rrsig' >> example.com.zone
$ rrsig key.pem example.com.zone | tee example.com.zone.rrsig
example.com.    86400   IN      RRSIG   SOA 13 2 86400 20200616002419 20200517002419 32716 example.com. pT8tmBBTpTG139CBJbN1MbshvygYyaiNn713gmvMw2Y/C2dTwGSZwuriXOk7luLb+Ej9OHvcjgaNaVzWnu5IiQ==
example.com.    86400   IN      RRSIG   A 13 2 86400 20200616002419 20200517002419 32716 example.com. ziulNlLfYTwUO0VGiVW4TSR3Pfg8j/RhUhuWCbL2rn9PVBUIr3P0ql5JHkfskfCy9BNDIW7rSIWxwuLBULfudw==
example.com.    86400   IN      RRSIG   NS 13 2 86400 20200616002419 20200517002419 32716 example.com. 9FdDokZ6RWGcAZTgpB430T71t9NZWeCZLTqxkeDyi77vxDt5eRwCNdzdDIEYaChGIfX6NBcrFIZ9Arz7vEA+ww==
example.com.    1200    IN      RRSIG   NSEC 13 2 1200 20200616002419 20200517002419 32716 example.com. QeClnuEuVdq0Wppv+kH0DNR3huWFw7Rack0ZuFRqEpRLfVx/NTaaieHBax4SJTgecaF2MgpT+f/yJsRe/rsr3g==
example.com.    86400   IN      RRSIG   DNSKEY 13 2 86400 20200616002419 20200517002419 32716 example.com. ypFHj/ttCnJkzOsCSj+SM+pU7yj9jfT7IaHZpotrU1ITOQBj2x+5nhQSj7dAbi21N4Vjie1rS5vx7E6T2g0msg==
ns1.example.com.        86400   IN      RRSIG   A 13 3 86400 20200616002419 20200517002419 32716 example.com. /M9W4asOST8JuRfibKA0hf780GX3HglEsgB1PoNuV2PCK5sTXWKVexb7wfxAeBAK/gDsLy3HQIPH2im6iRuI9g==
ns1.example.com.        1200    IN      RRSIG   NSEC 13 3 1200 20200616002419 20200517002419 32716
example.com. Mph6z5j6ZePdrxoO/vBr1rwA76a/0lpkUEfsiNWOtELtoPCNRrhRDxvQWM/mPfRw+plfzFXqANymU5shvPwZZA==
At this point, our zone is complete and we can signal our nameserver
to reload it. That was a bit of work, but fortunately, most of it
is just one-time setup. To keep your zone up to date you will just
need to periodically re-sign your records with rrsig so that they
don’t expire (the default signature validity period is 30 days).
A good way to do this is with a cron script. The details will depend a lot on your setup, but something like the following should work:
#!/bin/sh -e

cd /path/to/zone

# increment serial
awk '/; serial/{sub(/[0-9]+/, $1+1)} {print}' example.com.zone > example.com.zone.new
mv example.com.zone.new example.com.zone

# sign zone
rrsig /path/to/key.pem example.com.zone > example.com.zone.rrsig

# reload nameserver
nsd-control reload
Deterministic signatures
One interesting thing I noticed while working on dnssec-rr is that BearSSL’s ECDSA implementation always returns the same signatures for the same data, while the signatures from dnssec-signzone and ldns-signzone varied from run to run. It turns out this is because BearSSL implements RFC 6979, which is actually recommended for use with DNSSEC. This is not surprising, since both have the same author. A nice result of this is that none of the dnssec-rr tools need any entropy source; they are completely deterministic.
Using a separate KSK and ZSK
In these examples, we have been using the same key to sign our
DNSKEYs as we used to sign the rest of our records. This is
sometimes referred to as a Combined Signing Key (CSK). It is worth
mentioning another common DNSSEC configuration, which is to use a
separate Key-Signing Key (KSK) and Zone-Signing Key (ZSK). The
distinction between the two keys is the Secure Entry Point bit in
the DNSKEY record mentioned earlier.
An advantage of this approach is that it is easier to rotate a ZSK
more frequently (changing a CSK involves updating the DS record
in the parent zone). This allows for shorter key sizes for smaller
signatures. However, ECDSAP256SHA256 offers comparable security
to 3072-bit RSA, with much smaller signatures. This makes the ZSK/KSK
approach less appealing due to its complexity.
DS
At this point, you might be wondering, if a DNSKEY is used to
validate the signature of a record, and it is a record itself, how
can we trust the DNSKEY?
The answer is through a DS (Delegation Signer) record, which
contains a hash of your DNSKEY record and is added to the parent
zone. The DS record is signed by the parent zone, just like the
rest of its records, establishing a chain of trust from the root
domain to your zone.
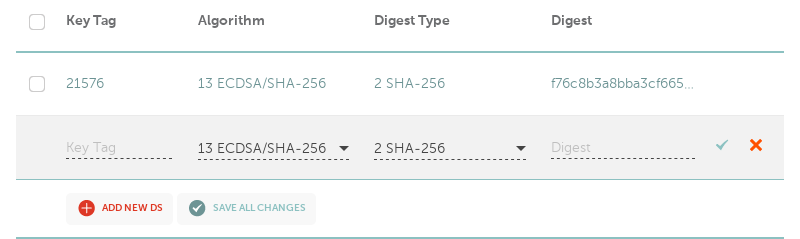
Usually, DS records can be configured through your domain registrar.
The DS record fields can be calculated using ds:
$ ds example.com. key.pem
example.com.    IN      DS      32716 13 2 ffd819c99ed62247e5fa61711a53fc0202a35970ca8ec78d874e2667556c594b
My domain is registered through Namecheap, which has a web form for entering these fields:
Putting it all together
We have now extended our zone with signatures and public keys, as
well as established a chain of trust from the DNS root to our zone.
After waiting for everything to propagate, DNSSEC-enabled clients
such as delv should be able to validate responses from our
nameserver, whether the record exists or not.
A handy tool for visualizing the structure of all these records and identifying problems is dnsviz.net. Here’s the output for my domain:
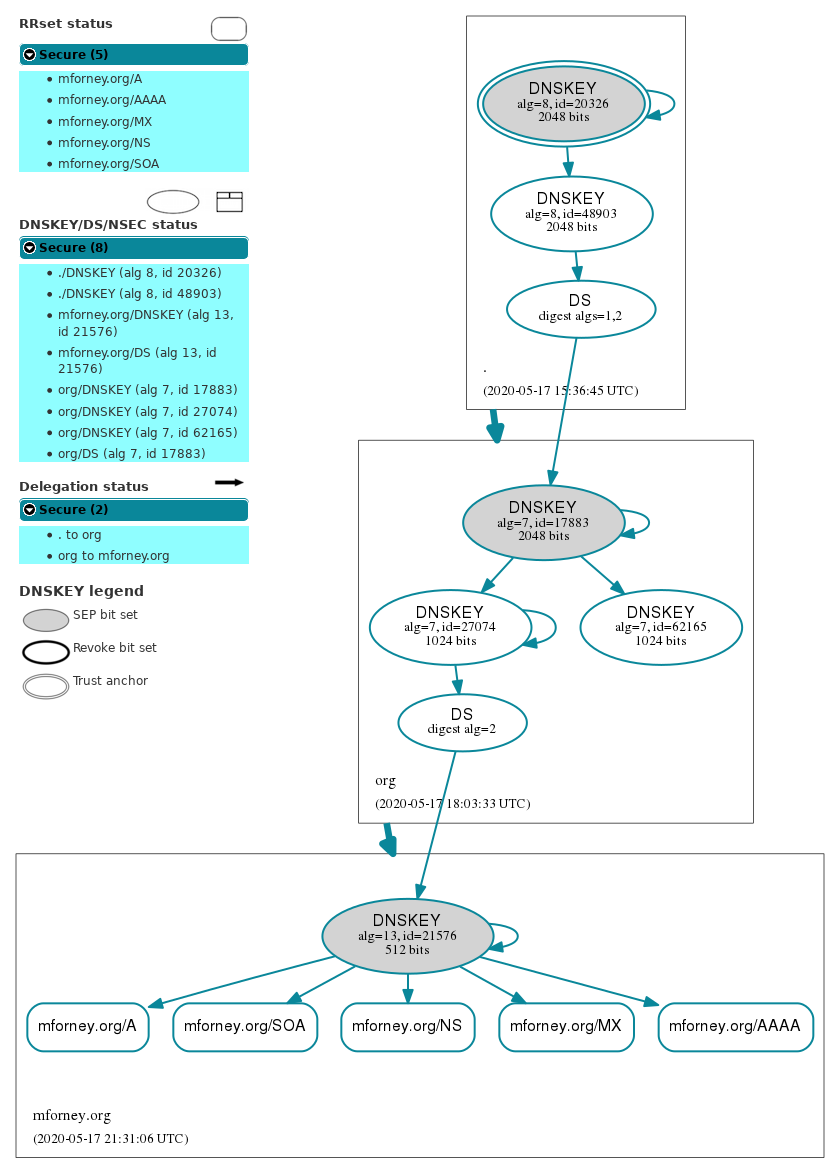
Pretty cool, huh?
DANE
Now that we have a mechanism of providing DNS results that clients can trust, we open up the possibility of using DNS to store things like certificates or keys. In the context of TLS, this is done with DANE.
DANE introduces one new record type, TLSA, and is added at special
names indicating the port and protocol it applies to. For instance,
we might have one at _443._tcp.example.com., which applies to TLS
connections to TCP port 443 (i.e. HTTPS).
A TLSA record has three numeric fields, followed by “certificate
association data”. The first field specifies how the certificate
should be validated and has four possible values:
- PKIX-TA (0): usual certificate chain validation must be performed, but restricted to the specified certificate authority.
- PKIX-EE (1): usual certificate chain validation must be performed, but the end-entity certificate must match the specified certificate/key.
- DANE-TA (2): certificate chain validation must be performed, but with the specified certificate authority, which need not be otherwise trusted by the client.
- DANE-EE (3): certificate chain validation is skipped; all that matters is that end-entity certificate matches the specified certificate/key.
The second field specifies whether the subsequent data refers to the entire certificate (0), or just the public key contained within the certificate (1).
Finally, the third field specifies whether the subsequent data is the full certificate/key (0), the SHA-256 hash (1), or the SHA-512 hash (2).
Let’s say we already have a web server configured for HTTPS and
wish to add DANE support. A good choice for the TLSA parameters
is 3 1 1. This means that clients should accept any certificate
that has a public key with the specified SHA-256 hash.
The advantage of this approach is that whenever our certificate is
reissued, we don’t have update the TLSA record. In a sense, we
are replacing the usual X.509 certificate validation with DNSSEC.
We use an RRSIG instead of the certificate, the DNS hierarchy
instead of a certificate chain, and the root DNSKEY instead of a
bunch of trusted certificate authorities.
There is no tlsa tool for dnssec-rr yet, so for now we can just
use the openssl command-line tool to calculate our public key
hash:
$ openssl x509 -pubkey -in /path/to/certificate.pem -noout > publickey.pem
$ openssl pkey -pubin -in publickey.pem -outform der | sha256sum
8bd1da95272f7fa4ffb24137fc0ed03aae67e5c4d8b3c50734e1050a7920b922  <stdin>
Now we have all the pieces we need to write our TLSA record:
_443._tcp.example.com. IN TLSA 3 1 1 8bd1da95272f7fa4ffb24137fc0ed03aae67e5c4d8b3c50734e1050a7920b922
After bumping our SOA serial, resigning our zone, and reloading
our name server, we are good to go. We can verify that everything
is in order using the danecheck web tool.
UPDATE 2021-05-14: With the release of dnssec-rr 0.1, there
is now a tlsa tool which can be used to generate this record:
$ tlsa _443._tcp.example.com. /path/to/certificate.pem
_443._tcp.example.com.	IN	TLSA	3 1 1 8bd1da95272f7fa4ffb24137fc0ed03aae67e5c4d8b3c50734e1050a7920b922
Conclusion
There are lots of benefits to DNSSEC. DNS is an important part of the internet, so it is surprising that in 2020, DNSSEC validation is not the norm. In fact, some ISPs even use the ability to man-in-the-middle your DNS queries for advertising or other purposes. DNSSEC puts an end to this.
Besides DANE, there are several other interesting systems that are
made possible by DNSSEC. For example, did you know that you can
store SSH host key fingerprints in DNS with an SSHFP record and
configure OpenSSH to check them automatically? I sure didn’t!
I hope I’ve inspired you to configure DNSSEC and DANE on your own server. If not, maybe you learned a little more about how it works and why it’s important. In any case, thanks for reading this far!